Helena Flooring Pros greatly impact how a room looks, feels, and functions. It is essential to understand the different types of flooring available, including their cost and durability.
Buying a new floor is an investment, so consider your lifestyle and budget before choosing a type of flooring. To boost your savings, consider ways to cut back on extra expenses like cable TV, bottled water, or coffeehouse drinks.
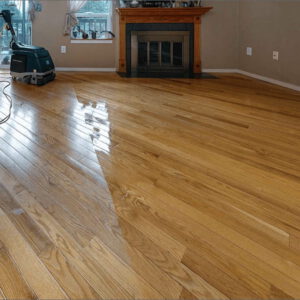
Wood flooring adds warmth and character to a space. It is available in a variety of colors, cuts and species. Hardwood floors have a natural durability that ages beautifully. It is easy to maintain and can be sanded down when necessary. When selecting your hardwood floors, be sure to consider how they will hold up to the level of traffic in the room. Hardwoods with a high Janka hardness rating, such as hickory, are better suited for areas that experience high volumes of traffic because they resist scratches and dents.
When it comes to choosing a wood floor, there are many factors to consider: the type of tree, growing characteristics, age and grain pattern all affect how your floors will look. The color of the wood will depend on its exposure to sunlight and other environmental conditions. Hardwoods that are more photosensitive, such as cherry, can darken when exposed to sunlight.
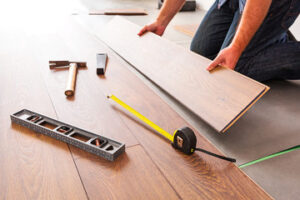
The first step in creating wood flooring is to saw the logs into planks. Then, they are dried to a consistent moisture content before they are milled. The milling process includes a series of cuts that make the planks even and smooth. Next, a tongue and groove system is cut into the planks to allow them to fit together snugly. Finally, the planks are sanded by hand or machine to create a smooth surface that is ready for staining.
There are two types of wood flooring: solid and engineered. Solid wood has traditional hardwood on its surface, while engineered wood has plywood or HDF as a core. Solid wood flooring can be made in wider widths than engineered wood, but the wide planks may require more nails and glue to prevent warping over time.
Both solid and engineered wood have natural benefits that make them popular options. However, solid wood requires more trees than engineered wood to produce the same amount of flooring, so it is important to choose a sustainable supplier when selecting your floors. Hardwoods can be reclaimed, reused or recycled at the end of their lifespan and are biodegradable.
Tile
Tile is a sturdy flooring material that works well in any room. It’s available in a wide variety of patterns, colors and textures and can be used to create unique design features in kitchens and bathrooms. It’s also moisture resistant and requires very little maintenance to keep it looking new.
Depending on the type of tile chosen, it may have a natural or synthetic look. Ceramic tile is created from baked clay and is the most popular. It’s often glazed and comes in a multitude of colors. Porcelain tile is denser than ceramic and is fired at higher temperatures. It’s often glazed, as well, and available in many different colors and patterns.
Other types of tile include stone, natural brick and terra-cotta tiles. These are often textured and provide a warmer feel to the floor. Some are even designed to resemble wood planks, making them a good option for those who want the warm look of wood without the upkeep concerns.
Tile is extremely durable and resists scratches and stains. It’s also impervious to extreme temperature fluctuations, which protects the subfloor from warping and rot. Its moisture resistance prevents the buildup of fungus, viruses and other bacteria that can cause health issues in some people. Additionally, glazed tile doesn’t require the use of toxic chemical cleaners.
One downside to tile is that it may make your feet colder in the winter, although heated floor systems can be installed for a more comfortable feel. And while it’s easy to clean, it can be difficult to maintain in high-traffic areas if there are a lot of dropped items.
A tile’s thickness plays a role in its appearance, as thicker tiles are better suited to floors where they can endure heavy traffic. Other factors that affect how a tile will appear on the floor are its layout, installation method and grout. Tile can be laid in a variety of patterns, including herringbone, offset, stacked or in a mosaic. It can also be shaped into rectangles, hexagons and other non-square shapes. It’s important to consider all of the options before deciding on a tile flooring type for your home.
Cork
Cork flooring is a popular choice among those who want to go green. Harvested from the bark of the cork oak tree without harming the tree, it’s a renewable resource that’s also one of the most environmentally friendly flooring materials available. It’s an excellent insulator, cutting noise and maintaining a steady room temperature.
The honeycomb cellular structure of the bark contains a high amount of air, giving it a soft and cushiony feel underfoot. It’s great for areas where people stand a lot, like kitchens, and helps reduce back pain. It’s also shock absorbent, protecting against falls and injuries from dropped dishes. This makes it a good choice for children’s rooms and older residents who are prone to falling.
Its natural water-resistance also means that it’s easy to clean. A broom, mop or vacuum (on the bare floor setting) can wipe up most spills and dust, but it’s important to use non-toxic cleaners and avoid any abrasive scrub brushes or abrasive pads as these could cause scratches. It’s also important to seal your cork with a clear coat finish at least once a year to protect it from moisture and staining, especially if you have a light colored floor.
A water-based clear coat finish will also help the color of your cork flooring remain consistent over time. Solvent finishes tend to yellow the floor, but water-based products allow the natural lightening of the cork to show through.
Cork floors are very durable and can withstand a great deal of wear and tear. They’re not as scratch-resistant as hardwood, but they’ll bounce back from furniture marks and other impact damage much better than other types of flooring. Cork is also very quiet, as the cellular structure cuts sound transmission between rooms and within a room.
The best part about cork is that it’s often DIY friendly, as panels are available in a click-together application and sit on top of nearly any smooth surface. However, for complicated or sizable installations, we recommend enlisting the expertise of an experienced cork installer and their specialized tools to ensure that your project is a success.
Flagstone
Flagstone is a beautiful and durable flooring option. It adds a rustic and natural look to any outdoor area, and it’s available in many different colors and sizes. It’s a popular choice for walkways, patios, and exterior features of the home. It’s also easy to maintain, and it can withstand the elements and traffic of an active household.
While it may seem difficult to choose the right type of flagstone for your floor, there are some simple steps you can take to ensure that you’re getting the best value for your money. The first step is to consider your needs. Think about how much foot traffic you’ll have and whether you need to accommodate wheelchairs or strollers. You should also consider the size of your space and what kind of aesthetic you want. Then, you can decide which color and finish will suit your needs best.
When choosing a flagstone, it’s important to consider how rough or smooth you want your floors to be. Some flagstones are very rough and have a natural, earthy texture, while others are more refined and have a smooth surface. The shape and texture of the flagstone will also affect how durable it is. Rougher surfaces are more prone to damage, so they’re not suitable for areas that will see a lot of traffic.
The finish of your flagstone will also play a role in how your floor looks. There are several different finishes that you can choose from, including tumbled, broken, and pillowed edges. These textures give the floor a worn, traditional look, and they can be used to create an authentic aged appearance. You can also have your stone floor brushed or acid treated to create a more subtle and modern appearance.
The final stage of installation is to fill in the gaps between your pavers with sand or pea gravel. This will help to protect the underlying material from water damage and prevent weeds from growing in between the stones. You should also seal your flagstone once it’s been grouted to help preserve its durability and color. It’s also a good idea to sweep the floor on a regular basis and clean it with mild soap and warm water.