How Hard Floor Refinishing Can Extend the Life of Your Floors

Hardwood Floor Refinishing Bergen County NJ is a good option for floors that have major scratches or dings. Deep gouges may need to be filled with wood putty after sanding.

Hard Floor Refinishing

Polyurethane finishes are available in oil-based and water-based versions. Oil-based products dry slowly and emit nasty odors. The water-based options dry quicker but still have a tendency to show imperfections.

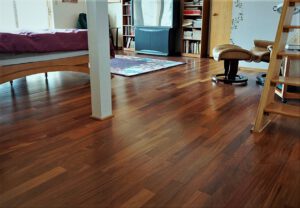
Hardwood floors can last a lifetime, but they need to be well cared for to stay beautiful. Refinishing your hardwood floors can keep them looking new. In some cases, refinishing can even extend the life of your floors by several decades. Unlike resurfacing, which may involve the removal of floorboards, refinishing is simply the application of a new coat of finish. While this process is simple in theory, a quality job requires careful attention to detail.

Before you begin, it’s important to remove any furniture from the room. This will allow you to see the floorboards more clearly and make repairs as needed. It’s also a good idea to vacuum or sweep the floor thoroughly, as this will help get rid of dust and dirt that may mar your final product. It’s also important to check for protruding nails, which should be hammered down. Finally, make sure the room has a fan and open windows to ventilate it.

During your first sanding pass, it’s a good idea to mark the area that has already been sanded with a pencil so you don’t accidentally resand the same areas again. You can also draw lines on the floor to help you find and identify areas that need additional sanding. After your first sanding pass, clean the floor thoroughly again to make sure that you have removed all of the dust left behind from your work.

For the second sanding pass, you’ll want to use an 80-grit sanding pad on your buffer to smooth out any scratches or rough spots from the first sanding. Once again, be careful not to sand too deeply, or you could damage the floorboards. Finally, a third and final sanding pass with a 100-grit sanding screen on your buffer will leave your floor looking like new.

Once your floors are sanded, it’s time to choose your finish. Many homeowners choose a water-based polyurethane, but oil-based options are available as well. Water-based polyurethanes are easy to apply and dry quickly. However, they are prone to yellowing over time. Oil-based options, on the other hand, dry more slowly but last much longer. They also provide a richer color and are better for staining.

Staining

Staining is the process of coloring the cedar or oak boards to your preferred color. There are many different stains to choose from. It is important to use a stain that is low in VOCs (volatile organic compounds) and oil-based so that it will be durable and last for a long time. The best stains will also be easy to clean and dry quickly. After the stain has dried, it is ready for a topcoat of polyurethane. The topcoat of polyurethane will protect the floor and give it a nice shine. It will be important to apply several coats, letting each one dry in between. Water-based polyurethanes can be used on floors, but they must be sanded between each coat to get a smooth finish. Oil-based polyurethanes are more durable, but they can take a longer time to dry.

Before applying the new topcoat, it will be a good idea to lightly sand the boards again with 80-grit sandpaper. This will make the surface of the wood very smooth and help the polyurethane adhere to it better. It is also a good idea to sand the edges of the boards so that they will be less likely to chip or splinter.

Once the sanding and staining are complete, it is a good idea to vacuum and sweep the floors to remove any remaining dust or dirt. Then, the floor can be wiped down with a clean rag and a little mineral spirits to remove any grease or oil. After this, the floors can be buffed with a sander or buffing machine to get a beautiful, shiny finish.

If you want to refinish your hardwood floors, it is a good idea to ask a professional to do it for you. Refinishing can be messy and requires a lot of patience, so it is not a project that should be done on your own. There are many advantages to hiring a professional, including the fact that they have the right equipment for the job and the experience to get it done correctly.

Sealing

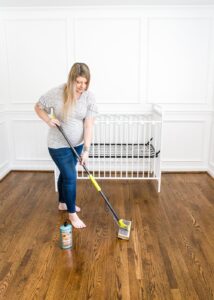
Sealing is the final step to protecting your new hardwood floors. It helps to keep them beautiful and looking new while protecting them from moisture, wear and tear, and UV damage. Choose a water- or oil-based polyurethane. A low-VOC (volatile organic compound) finish is best if you have sensitive indoor air quality. It takes about 24 hours for the finish to dry completely. You should wear protective footwear, such as sneakers or rubber boots, while working with this type of finish to prevent slipping and tripping. Also, cover your shoes and nose with a respirator that has organic vapor canisters to avoid breathing the finish fumes.

To test how well the finish protects your floors, mask off two 6-by-6-inch areas on the floor. Clean the area and roughen a small area with a 120-grit screen. Then apply a coat of polyurethane and let it dry. When dry, scrape the surface with a coin. If the wood is protected, no residue should come up. If it does, the refinishing process will need to be repeated.

You can use a natural-bristle brush for oil-based urethane or a synthetic brush for water-based urethane. You can also purchase an applicator pad attached to a long handle for applying the finish. Apply the first coat slowly and thinly, so you don’t get lap marks. Then apply additional coats until your floor is smooth and shiny.

Whether you decide to refinish or resurface your wood floors, it’s important to do your homework and have an experienced contractor on hand to guide you. A professional will have the right sanding and staining equipment as well as high-quality finishing products. They can help you make the best decision based on the current condition of your wood flooring and your personal aesthetic.

A solid wood floor can be refinished four or five times before it’s time to replace it. Resurfacing is much less expensive than refinishing, but it doesn’t offer the same dramatic improvement. If you want to save money and still bring your old wood floors back to life, resurfacing may be the right option for you.

Installation

When the refinishing process is complete, it’s time to install the new finish. First, the floor is thoroughly cleaned using a degreasing product like TSP or hot water and bleach. Then, the floor is vacuumed to remove dust and debris. If the room is being remodeled, this is also the time to install trim or paint. This is not included in refinishing, and homeowners should check with their contractor to see what is expected.

Before the installation begins, all furniture must be moved out of the room. The refinishing company will usually charge for this, but homeowners can save $20 to $50 per room by handling it themselves. They should also ask the refinishing company what their policy is on area rugs. Most will allow rugs to be put back on the floor after the finishing coats have dried, but it is best to wait a few days before doing so.

In some cases, the refinishing process may be enough to correct a problem with the wood that can’t be addressed any other way. For example, if the wood is prone to cupping (which is often caused by water damage), sanding will even out the planks. In other cases, a deep gash or ding can be filled with trowel filler after the sanding stage. This will fix the problem and make the floor look good, but it is not a long-lasting solution.

Many people confuse refinishing with resurfacing, and this is understandable since the two processes are similar. However, the difference is important: refinishing involves stripping the old finish off the wood, and resurfacing uses a machine to rough up the surface of the existing finish. Resurfacing is much less labor-intensive, but it will not last as long as refinishing.

The type of polyurethane used is another important consideration. Most contractors will use a water-based formula because it stays clear longer than oil-based finishes. However, some customers prefer the smell and durability of oil-based urethane.

A refinisher will usually apply three coats of polyurethane, although some will go as high as four. Homeowners should also pay attention to the color of the urethane they choose. If the flooring is light-colored, for example, a natural or amber-colored finish will look better than a white-based one.

What Is Metallic Epoxy?

Metallic epoxy is a unique flooring solution that has a lot to offer. It is a self-leveling epoxy coating with metallic pigments that can be manipulated to create a wide variety of visual effects.

Metallic Epoxy

These floors are long-lasting and durable. They are resistant to impacts, abrasions, moisture, oil, and chemicals. For more information, read on Top Coat Technicians.

Metallic epoxy is a beautiful option that can add an eye-catching look to any floor. The unique look can turn a boring concrete floor into a one-of-a-kind flooring solution for businesses and homes alike.

The best thing about this style is that it can be made to resemble anything from tinted glass to natural stone-like slate. The possibilities are limited only by the imagination of the floor’s designer and the lighting in the space. Unlike flake industrial epoxy systems, which have a more textured finish, metallic finishes offer a sleek, seamless appearance.

These floors can also help brighten a space and create a sense of depth and dimension. They are not only a great addition to commercial spaces like warehouses and garages but can also be used in offices, hair salons, hotels, and restaurants.

A common misconception is that these floors will be slick, but they are actually highly slip-resistant. The reflective nature of the floor helps to make it less slippery, and topcoats can be added that are even more non-slip.

Because of the way the coating is applied, the process takes longer than traditional industrial epoxy. It is not a good idea to attempt this as a DIY project, and it is important to work with a team of professionals who are familiar with the materials and techniques involved in achieving this type of coating. Inexperienced installers could end up ruining the appearance of the floor with amine blushing or other issues that can affect the quality of the finish.

During the installation process, the metallic pigments are manipulated with air by using an air nozzle or blower. This allows for 3D effects like moon craters, waves, and puddling ripples. Then, the epoxy is self-leveled for a finished appearance. These types of epoxy coatings are very durable and long-lasting and can protect the underlying concrete from moisture, grease, oils, and foot traffic. They are resistant to most chemicals and acids and can withstand impact. They also hold up well against heat, salt, and sunlight.

The Performance

When professional materials are used and installed by experienced flooring contractors, metallic epoxy can be one of the most durable systems available. It will resist abrasion, punctures, chemical spills, and heavy foot and vehicle traffic for years to come. It’s also easy to clean and maintain, and it won’t trap moisture or encourage the growth of mold, mildew, or bacteria.

A metallic epoxy floor has a shimmering, three-dimensional look that’s unlike any other type of flooring. It requires an experienced contractor to install it because the pigments must be agitated, dispensed, and layered properly to create that unique, mesmerizing effect.

Metallic pigment powders are continuously incorporated into the epoxy during the curing process. This movement is what allows no two floors to be identical, even when using the same colors. The pigments will move, swirl, and refract light in different ways to make each floor unique. Achieving this unique look is not an exact science, and color variations will occur from batch to batch. The best way to avoid this is to work with a company that makes it clear that the results may vary and that no two floors will ever look exactly the same.

While they add a stunning visual element to your floor, these floors aren’t just for aesthetics. They’re highly functional and can be customized to meet your specific requirements. For instance, they can be made to be low-yellowing, seamless, antimicrobial, slip-resistant, and chemically resistant. This means that they’re ideal for a range of environments, from restaurants and museums to waiting rooms and showrooms.

While they may be trendy now, will metallic epoxy still be in style ten years from now? It’s hard to say, and it may not be the best choice if you want a long-lasting flooring solution. If you’re looking for a more timeless option, we would recommend considering a full-chip polyurea coating instead. While it’s more traditional than a metallic floor, it will still provide the elegant and modern look that you’re after. It’s also easier to apply than a metallic finish and can be applied in 1 to 2 days, which will help you minimize the amount of time that your business needs to shut down for installation.

The Cost

Metallic epoxy is a type of flooring that uses mica powder to create a unique and eye-catching look. The mica powder is infused into the epoxy resin and swirled into place during application to create what appear to be three-dimensional shimmering swirls in the finished floor. This type of epoxy is usually more expensive than traditional chip epoxy, but it also has a much more dramatic and interesting appearance.

The textured finish of metallic epoxy makes it an excellent choice for areas where visual impact is important, such as showrooms or other public spaces that need to make a statement. The textured surface can hide dirt and other imperfections, and it is easy to maintain with regular cleaning. Additionally, the textured surface can help with slip and fall prevention.

In addition to its visual appeal, a metallic epoxy floor is durable and provides excellent chemical resistance. This makes it an excellent choice for garage floors, where chemicals and oils can deteriorate other types of floor coverings.

A metallic epoxy floor is also a great option for areas where people are going to be walking and moving heavy equipment. It is not recommended for areas that will be used to store or transport hazardous materials, however, because the epoxy can become a fire hazard.

If you’re considering installing a metallic epoxy floor, it’s important to find the right contractor for the job. A professional installer will ensure that the epoxy is applied correctly and will provide a high-quality finish that lasts for years. They will also be able to advise you on the best options for your specific flooring needs.

Unlike paint, epoxy coatings require special preparation to ensure they adhere properly to the concrete. It’s essential to remove all grease, oil and other stains from the floor before applying the epoxy coating.  If the coating is not properly prepared, it can begin to peel and crack over time. A professional will use power tools to grind the surface and chemically treat it to prepare it for the coating. Once the floor is prepared, it can be coated with a thin layer of primer to protect the surface and prevent bonding issues. Once the primer is dry, the actual metallic epoxy can be applied. This can be rolled on or sprayed on, and it typically takes between four and eight hours to fully cure.

The Versatility

Metallic epoxy is not only eye-catching but also offers a number of performance benefits. It can be manipulated to create different effects, such as the appearance of flowing lava, pearlescent designs, and even two-tone finishes. These effects are created by using a variety of techniques, including brushing, sprays, and blowers, on the epoxy as it is being applied. Once cured, these effects can be used to add flair to commercial environments like showrooms and waiting areas.

As a result, these floors are often chosen for high-end retail environments and areas where products are being showcased. They also make an excellent choice for restaurants, art galleries, and other similar spaces where a sophisticated look is required. This is due to the fact that these floors provide a unique aesthetic with a number of other advantages that can help a business succeed in a competitive marketplace.

For example, epoxy flooring is extremely durable and can withstand a wide range of chemicals. It is also anti-microbial, meaning it resists microbes and other pathogens that could cause infection or sickness in employees and customers. Furthermore, the seamless surface is easy to clean and does not require waxing or polishing. This is a major advantage over traditional materials like wood, concrete, and tile, which can become stained or damaged and need to be replaced regularly.

Another great benefit of epoxy is that it is stain-resistant. This means that spills and other stains will not stain the floor, giving it an appealing, finished look for years to come. Additionally, it is possible to add topcoats to the epoxy that are even more stain-resistant if this is an issue at a particular facility.

Finally, although metallic epoxy may look slippery at first glance, it is actually quite non-slip. This is largely because of the way the coating is applied, which includes using multiple layers and applying the pigments with a special process. It is also possible to add topcoats that are even more slip-resistant if needed.

Overall, metallic epoxy is an excellent option for commercial and industrial flooring that needs to be durable, anti-slip, hygienic, and stylish. While it is a more expensive option than other flooring, the cost can be justified by its performance and visual appeal.

How to Keep Your Hardwood Flooring Looking Great

Whether you’re building a new home or updating the floors in your existing one, hardwood flooring is a great way to add warmth and elegance.

Hardwood Flooring

Hardwood floors are available in a variety of colors and shades to suit almost any interior design theme. They also adapt to changes in decor, so they’ll always look good and fit your lifestyle. 

Adding hardwood flooring to your home can increase the value of your property, as well as provide an elegant aesthetic. You may want to install it yourself, but you can also hire a professional.

Typically, the installation cost of hardwood floors varies between $3 and $8 per square foot, depending on the species you choose. In addition, you will need to consider the amount of time it takes for the project to complete. Larger rooms take less time to install than small ones, which will impact your total cost.

The installation process of wood flooring requires precise measurements and careful handling of the material. This is why a professional should be hired to complete the job.

To ensure that the floor is installed correctly, it is recommended to follow the manufacturer’s instructions. This will not only protect your investment but also extend the life of your new floor.

If you decide to do the installation yourself, a few helpful tips can help make the process go more smoothly. Start by laying out the room you’ll be installing in, removing any furniture, and making sure the subfloor is ready for the new floor.

After the area is prepped, it’s time to cut the wood for installation. It is recommended to use a circular saw for this task, as it will provide a more precise cut.

When cutting the wood, it is important to make sure that each piece is at least 6 inches long. This will keep the boards from being too short and causing problems with your installation.

Once the pieces are cut, you’ll need to nail them together. Nail guns are available that will allow you to quickly and easily nail the boards down.

It’s important to follow the manufacturer’s installation instructions, as these can affect the durability of your hardwood flooring. This is especially true if you have to install the floors over concrete or a hard surface.

You should also consider the level of moisture in the environment in which you’re planning to install your hardwood. Taking the proper amount of time for your flooring to acclimate to the humidity can affect how it performs over time, as well as its overall lifespan.

Wood floors can be prone to damage, especially in high-traffic areas. While some damage, like dents and scratches, can be fixed, others, such as rotted wood, termite infestation, or moisture damage, will need to be replaced.

There are many different hardwood flooring repair methods available, so it is important to find the right solution for your unique situation. For example, if you have a small crack in your hardwood floor, repairing it with wood filler and sanding it is often an easy option. However, if you have extensive cracks throughout your floor, it may be more cost-effective to replace the flooring.

Another common type of repair is fixing buckled hardwood flooring. This can be done easily and inexpensively. If your floors are in generally good condition but have a few buckling boards that need replacement, repairing them is a great DIY project to try before calling in the pros for a full-scale refinishing job.

You’ll need a few different tools for this project. First, mark out the area to be repaired with a carpenter’s square. Next, use a wood chisel to split the damaged board into two pieces.

After removing the damaged section, remove any excess wood putty from the area. This will make it easier to re-sand and stain the new hardwood piece.

The sanding and staining process can be long and tedious, but it is worth the effort to get your wood flooring back to looking its best. After the flooring is completely refinished, you will be able to enjoy it for years to come!

Depending on the severity of the damage, you can either fill the holes with a filler, sand them, and then apply a finish. Alternatively, you can sand the entire floor and then apply the same finish.

Types of Interior Painting Jobs You Can Have Done to Your Home

There are many different types of interior painting jobs that you can do to your home. If you want to update your home, you can try to do the job yourself or you can hire someone to do it for you. For example, you can paint the inside of your home, the outside of your home, or both. But you need to make sure that you know what you’re doing. Luckily, there are plenty of guides available to help you do the job correctly.

Interior Painting

Low-VOC paints are a great way to preserve the environment and reduce indoor air pollution. They are also a healthier option for your family and pets. It’s important to choose paints with third-party certifications.

VOCs are a type of carbon-containing compound that is released into the air as gasses. These chemicals can be hazardous in the short term and long term. Inhaling these gasses can contribute to headaches, nausea, eye irritation, and liver damage.

The best way to reduce your exposure to these toxic fumes is to install an air purifier. You may also want to consider moving furniture outdoors. Adding potted plants to the room can also help filter the air.

The length of time it takes for low-VOC paints to off gas depends on the type of paint used and the climate in which it’s applied. Most latex paints off-gas for three to five years, while some other types of paints will off-gas for even longer.

Fortunately, many manufacturers have developed products with fewer VOCs. Some low-VOC paints contain as little as five grams of VOCs per liter. However, you can’t expect them to completely seal off VOCs from the coatings underneath.

Low-VOC paints are a safer and less expensive alternative to traditional paints. If you’re planning to remodel your home on a budget, it’s worth considering these paints.

The best choice is often to use zero-VOC paint. This will ensure you’re not inhaling any of these dangerous toxins.

If you are looking for high-gloss interior paint, you’ve come to the right place. It’s one of the shiniest paint finishes available and can be used in a number of applications.

High-gloss finishes offer the highest reflectivity and durability. They are also easy to clean and can hold up to high humidity. This makes them perfect for indoor and outdoor use.

While high gloss is one of the most durable sheens, it does have the tendency to show imperfections. This means it might not be a good choice if you want to hide scratches or stains. However, it can be a great accent for walls and trim.

For rooms that will receive a lot of heavy usages, you may consider choosing a paint finish with a higher sheen. A higher gloss level will also allow you to see more imperfections, such as rolls and bumps.

On the other hand, a high-gloss finish is also more reflective, so it’s not a great choice for hiding imperfections in walls. You may need to apply multiple coats to achieve the same results.

Semi-gloss and eggshell are two popular paint finishes. They have a lustrous look, but they are less durable than satin or high-gloss.

Satin is a middle ground between high gloss and eggshell. It is perfect for a wide variety of room types, from dining rooms to living rooms.

If you are looking to cover up an ugly drywall mess or want to add some character to your new home, there are several ways to do it. However, texturing your walls is a little more complicated than just slapping some paint on a wall. Fortunately, it is also a relatively inexpensive project.

The best way to texture a wall is to apply a layer of joint compound. A thick layer will give you a more defined texture. To do this, you’ll need a roller, a brush, and perhaps some plastic sheeting. Using the correct techniques, you can turn a dull surface into something extraordinary.

You’ll need to prime the wall with a drywall primer before applying the compound. Be sure to apply a coat of polyurethane as well. Once the texture has cured, you’ll be ready to paint. It’s a good idea to cover up the floor and other adjacent surfaces with drop cloths. Ideally, you’ll want to do this one room at a time.