How a Handyman Can Help With Home Improvements

Handyman Lexington KY helps people with a variety of home improvement tasks. The handyman can refer the customer to a specialist if the job is too large or requires specialized knowledge.

A handyperson can work in both commercial and residential settings. There is no formal education required to become a handyman.

Drywall is a great home choice because it offers a cost-effective alternative to wooden or concrete walls and gives rooms a modern look. However, it isn’t indestructible and can be damaged by several factors, from a run-in with the vacuum cleaner to a child flinging a toy at it. Luckily, fixing drywall damage isn’t difficult or expensive.

A spackle or joint compound and a putty knife can repair small holes and dents. Apply a thin filler coat to the hole and smooth it with the knife, then sand the surface until it’s even with the rest of the wall. Allow the filler to dry and re-sand if necessary. Then, touch up with paint if desired.

Larger holes may need to be patched with a drywall patch kit. If you choose this option, carefully follow the instructions on the package. It’s also important to ensure that no electrical or plumbing lines run through the area before attempting a repair. If you don’t spot these hazards, you could end up with a hole that leaks or supports mold growth.

If your drywall has been compromised by water or other environmental factors, it must be addressed immediately. Unaddressed moisture issues can lead to mold growth, structural deterioration, and rot. Handypersons who specialize in drywall repair and replacement can quickly and efficiently address these issues to protect your home.

Even minor drywall blemishes can detract from your walls’ overall appearance, so it’s essential to touch them before painting. However, completing this task requires much knowledge, precision, and skill and can be time-consuming and frustrating for novice DIYers. Professional handypersons have the skills and tools to get the job done quickly, safely, and with a professional finish.

Drywall contributes to your home’s insulation, fire resistance, and structural integrity. Regular inspections can catch any deterioration or problems early and help prevent serious damage. By making these repairs quickly and properly, you’ll enjoy the peace of mind of knowing your home is in good condition.

Handypersons are jack-of-all-trades—or at least that’s how they’re often portrayed in popular culture. Handymen have no formal training or licensure, but they know enough about carpentry, plumbing, electrical work, and many other trades to tackle a wide range of small- to medium-sized home projects and repairs.

They’re also familiar with a wide range of tools, and many handypersons have a toolbox filled with various items, from hand tools to power tools and everything in between. When asked to take on a project that falls into this category, they know exactly what the job entails and can complete it quickly and correctly.

When hanging a TV, there are a few key things that the handyperson must keep in mind. First, the TV must be mounted to a secure wall. This is important for security and ensuring that the TV doesn’t fall down in a storm or during a party. It’s best to mount the TV over a solid stud, like a fireplace mantel. The next step is deciding how high to mount the TV. If you do this carefully, the TV may stay high enough, making it easier to watch. To avoid this, having a friend help you and using a spirit level to ensure the TV is at a comfortable viewing height is best.

After drilling the pilot holes, it’s time to attach the mounting plate to the wall. Again, having a friend to assist you with this is a good idea since it can take a lot of work to do independently. It’s also a good idea to carefully read the directions on the wall mount, as they can vary slightly from one product to another.

Once the mount is attached, you can hang the actual television. Again, this task is better done with a friend, as lifting the TV without damaging it can be tricky. It’s also a good idea at this point to double-check the positioning of the TV and to tighten all of the screws on the brackets to make sure that they are securely in place.

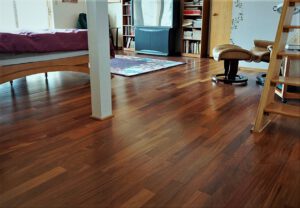
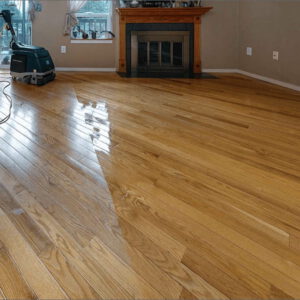
Whether you have wood flooring in your home or an industrial warehouse, floors must be well-maintained. Having a floor that looks good is not only pleasing to the eye, but it can also help a business run more efficiently. Hiring a handyperson can be an inexpensive repair method if your floors are damaged.

Before you start a repair, read the manufacturer’s maintenance guide to ensure you use a product compatible with your floor type. For example, if you have laminate flooring, you should use a repair kit with wood filler, putty, or a floor repair marker. The color of the repair product will need to match the color of your laminate flooring. When applying the patch, work in small areas so the color does not show too much.

Using gloves, goggles, and a mask when working with power tools is recommended to protect yourself from chemical burns, sharp edges, and inhaling fumes. It is also important to work in a well-ventilated area. A mask can also protect you from breathing in dust or other debris created while the project is completed. Using a fan to blow any dust away from the work area would be best.

Flooring repair can include sanding and staining to restore the appearance of your floors. Depending on the type of floor, this may consist of sanding to remove scratches and stains and staining to add color and protection. If the sanding process is done correctly, it will leave a smooth finish that will look great in your home or office.

You can also fix squeaky floors by placing shims or lumber under the offending planks to prevent them from moving up and down and rubbing against one another. It is important to ensure the shim is secure and short enough, as this will cause the floor to become uneven and unsteady.

It is possible to replace a floorboard independently, but you must know the proper techniques to avoid destroying other boards in your home or workplace. Start by locating the end and edge of the floorboard that needs to be replaced. Then, measure about an inch into the board from both the edge and end of the room to protect other boards from being cut during the replacement process.

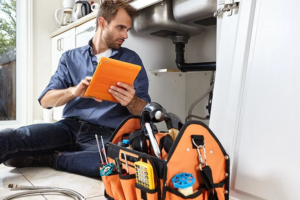
Many electrical components need to be repaired from time to time. These include outlets, switches, and fixtures. When one isn’t working correctly, it can cause a short circuit. This can result in a fire or other damage to your home. It is important to have these issues fixed as soon as possible.

To repair these problems:

  1. Start by checking the breaker box for any blown fuses or tripped breakers.
  2. Look at the information card to determine which receptacles, appliances, or lighting fixtures are on that particular circuit.
  3. Disconnect anything that’s unnecessary and inspect those you can’t disconnect for any signs of malfunction.

If you cannot and you need help fixing the problem yourself, hire an experienced handyperson who can do the job for you. Ensure they have a license and insurance in case of any accidents that may occur while fixing your electrical equipment.

You should also make sure to inspect and clean your electrical panels regularly. This will help keep them free of dust, debris, and corrosion. Additionally, you should avoid storing items near these panels and minimize heat buildup in rooms with them. By doing these simple things, you’ll help ensure your family’s and home’s safety.

How to Keep Your Hardwood Flooring Looking Great

Whether you’re building a new home or updating the floors in your existing one, hardwood flooring is a great way to add warmth and elegance.

Hardwood Flooring

Hardwood floors are available in a variety of colors and shades to suit almost any interior design theme. They also adapt to changes in decor, so they’ll always look good and fit your lifestyle. 

Adding hardwood flooring to your home can increase the value of your property, as well as provide an elegant aesthetic. You may want to install it yourself, but you can also hire a professional.

Typically, the installation cost of hardwood floors varies between $3 and $8 per square foot, depending on the species you choose. In addition, you will need to consider the amount of time it takes for the project to complete. Larger rooms take less time to install than small ones, which will impact your total cost.

The installation process of wood flooring requires precise measurements and careful handling of the material. This is why a professional should be hired to complete the job.

To ensure that the floor is installed correctly, it is recommended to follow the manufacturer’s instructions. This will not only protect your investment but also extend the life of your new floor.

If you decide to do the installation yourself, a few helpful tips can help make the process go more smoothly. Start by laying out the room you’ll be installing in, removing any furniture, and making sure the subfloor is ready for the new floor.

After the area is prepped, it’s time to cut the wood for installation. It is recommended to use a circular saw for this task, as it will provide a more precise cut.

When cutting the wood, it is important to make sure that each piece is at least 6 inches long. This will keep the boards from being too short and causing problems with your installation.

Once the pieces are cut, you’ll need to nail them together. Nail guns are available that will allow you to quickly and easily nail the boards down.

It’s important to follow the manufacturer’s installation instructions, as these can affect the durability of your hardwood flooring. This is especially true if you have to install the floors over concrete or a hard surface.

You should also consider the level of moisture in the environment in which you’re planning to install your hardwood. Taking the proper amount of time for your flooring to acclimate to the humidity can affect how it performs over time, as well as its overall lifespan.

Wood floors can be prone to damage, especially in high-traffic areas. While some damage, like dents and scratches, can be fixed, others, such as rotted wood, termite infestation, or moisture damage, will need to be replaced.

There are many different hardwood flooring repair methods available, so it is important to find the right solution for your unique situation. For example, if you have a small crack in your hardwood floor, repairing it with wood filler and sanding it is often an easy option. However, if you have extensive cracks throughout your floor, it may be more cost-effective to replace the flooring.

Another common type of repair is fixing buckled hardwood flooring. This can be done easily and inexpensively. If your floors are in generally good condition but have a few buckling boards that need replacement, repairing them is a great DIY project to try before calling in the pros for a full-scale refinishing job.

You’ll need a few different tools for this project. First, mark out the area to be repaired with a carpenter’s square. Next, use a wood chisel to split the damaged board into two pieces.

After removing the damaged section, remove any excess wood putty from the area. This will make it easier to re-sand and stain the new hardwood piece.

The sanding and staining process can be long and tedious, but it is worth the effort to get your wood flooring back to looking its best. After the flooring is completely refinished, you will be able to enjoy it for years to come!

Depending on the severity of the damage, you can either fill the holes with a filler, sand them, and then apply a finish. Alternatively, you can sand the entire floor and then apply the same finish.

Types of Interior Painting Jobs You Can Have Done to Your Home

There are many different types of interior painting jobs that you can do to your home. If you want to update your home, you can try to do the job yourself or you can hire someone to do it for you. For example, you can paint the inside of your home, the outside of your home, or both. But you need to make sure that you know what you’re doing. Luckily, there are plenty of guides available to help you do the job correctly.

Interior Painting

Low-VOC paints are a great way to preserve the environment and reduce indoor air pollution. They are also a healthier option for your family and pets. It’s important to choose paints with third-party certifications.

VOCs are a type of carbon-containing compound that is released into the air as gasses. These chemicals can be hazardous in the short term and long term. Inhaling these gasses can contribute to headaches, nausea, eye irritation, and liver damage.

The best way to reduce your exposure to these toxic fumes is to install an air purifier. You may also want to consider moving furniture outdoors. Adding potted plants to the room can also help filter the air.

The length of time it takes for low-VOC paints to off gas depends on the type of paint used and the climate in which it’s applied. Most latex paints off-gas for three to five years, while some other types of paints will off-gas for even longer.

Fortunately, many manufacturers have developed products with fewer VOCs. Some low-VOC paints contain as little as five grams of VOCs per liter. However, you can’t expect them to completely seal off VOCs from the coatings underneath.

Low-VOC paints are a safer and less expensive alternative to traditional paints. If you’re planning to remodel your home on a budget, it’s worth considering these paints.

The best choice is often to use zero-VOC paint. This will ensure you’re not inhaling any of these dangerous toxins.

If you are looking for high-gloss interior paint, you’ve come to the right place. It’s one of the shiniest paint finishes available and can be used in a number of applications.

High-gloss finishes offer the highest reflectivity and durability. They are also easy to clean and can hold up to high humidity. This makes them perfect for indoor and outdoor use.

While high gloss is one of the most durable sheens, it does have the tendency to show imperfections. This means it might not be a good choice if you want to hide scratches or stains. However, it can be a great accent for walls and trim.

For rooms that will receive a lot of heavy usages, you may consider choosing a paint finish with a higher sheen. A higher gloss level will also allow you to see more imperfections, such as rolls and bumps.

On the other hand, a high-gloss finish is also more reflective, so it’s not a great choice for hiding imperfections in walls. You may need to apply multiple coats to achieve the same results.

Semi-gloss and eggshell are two popular paint finishes. They have a lustrous look, but they are less durable than satin or high-gloss.

Satin is a middle ground between high gloss and eggshell. It is perfect for a wide variety of room types, from dining rooms to living rooms.

If you are looking to cover up an ugly drywall mess or want to add some character to your new home, there are several ways to do it. However, texturing your walls is a little more complicated than just slapping some paint on a wall. Fortunately, it is also a relatively inexpensive project.

The best way to texture a wall is to apply a layer of joint compound. A thick layer will give you a more defined texture. To do this, you’ll need a roller, a brush, and perhaps some plastic sheeting. Using the correct techniques, you can turn a dull surface into something extraordinary.

You’ll need to prime the wall with a drywall primer before applying the compound. Be sure to apply a coat of polyurethane as well. Once the texture has cured, you’ll be ready to paint. It’s a good idea to cover up the floor and other adjacent surfaces with drop cloths. Ideally, you’ll want to do this one room at a time.

Floor Refinishing – How to Spruce Up Your Hardwood Floors

If you are looking for a way to spruce up your floors, you should consider Hardwood Floor Refinishing. This process is a great way to breathe new life into old hardwood floors. However, there are some things to keep in mind before attempting this type of job.

Hardwood Floors

The cost of floor refinishing can vary greatly depending on where you live and the type of wood flooring you have. It is important to get at least three estimates and then choose the best company for your project.

The price of floor refinishing can range from $800 to $1,300 and is dependent on the size of the area being renovated. It will also depend on the type of flooring and whether or not it requires sanding and polishing. If you are renovating an entire floor, you will also have to consider the amount of furniture that needs to be moved out of the way.

The most expensive part of a floor refinishing project is the tools and equipment used to complete the job. Depending on the floor’s condition, a contractor may need to use a variety of sanding and polishing equipment to finish the job.

The refinishing process is often accompanied by a strong odor. To minimize the mess, homeowners should choose a high-quality hardwood floor cleaner. The refinishing process can be done by a homeowner but may take up more of the homeowner’s time.

The cost of refinishing a hardwood floor is typically higher than a softer wood type. For example, pine is a softer wood that absorbs stains differently than other types of wood. It is more likely to require extra sanding and polishing.

For a traditional look, oil-based polyurethane is a good choice. This finish is durable and easy to work with. Unlike water-based finishes, this type is able to stand up to heavy traffic.

It is a good idea to choose a reputable, professional refinishing company. This is especially important in tight rooms, as most of the equipment is large and hard to get into.

Refinishing a hardwood floor is a big job that requires careful preparation. The most important part is knowing the type of floor you have. Some types of floors cannot be refinished. If you have a pine or laminate floor, you will need to hire a professional to do the work for you.

The first step is to get the floor clean. You can use a floor sander or vacuum. For more effective cleaning, you can cover the floor with plastic tarps. This will ensure that any dust or debris does not get on the new finish.

The refinishing process is usually a full-day job. You will need to remove furniture, closet contents, and any objects that may be in the way. It’s also a good idea to ask friends and family to help you move things around.

It’s important to find the right sanding tool for the job. A drum sander is not the easiest to use. Instead, you should practice on plywood to get a feel for it. This is especially true if you have a sanding machine of your own.

When sanding, you should follow up with the big sander with a bit of edge work. This will remove the sanding marks and prep the floor for the final pass.

There are many steps in floor refinishing, but the re-coating of your floor should be the most obvious and least costly. It is a great way to freshen up the look of your home. Unlike refinishing, re-coating does not change the color of your hardwood. However, the final finish is only as good as the finishing agent you choose.

Re-coating a floor is a better and safer option than refinishing. It does not solve problems in the wood, but it will add a layer of protection.

Polyurethane is a type of plastic resin that forms a tough protective film on wood surfaces. It protects against moisture and scratches. It is a durable finish that can last up to two decades. It is used in wood flooring and is especially recommended for exterior applications.

There are two types of polyurethane finishes: oil-based and water-based. Each type is different and has its own properties. Generally, water-based polyurethane is less expensive than its oil-based counterpart, but it’s not as durable. To ensure you choose the best finish, ask a professional floor installer who is right for your home.